How to Install and Use Fritzing for Circuit Design: A Step-by-Step Guide

How to Install and Use Fritzing for Circuit Design
Fritzing is an open-source platform designed for electronic circuit design, which allows users to create, document, and share their electronic projects easily. Whether you are a beginner looking to learn the basics of circuit design or an experienced engineer wanting to create detailed schematics, Fritzing provides a user-friendly interface that simplifies the process. In this article, we will guide you through the installation of Fritzing and provide a detailed overview of how to use it effectively.
What is Fritzing?
Fritzing is a free software application that combines a breadboard view, schematic view, and PCB (Printed Circuit Board) layout in one interface. This unique approach allows users to visualize their electronic designs in a way that is easy to understand. Fritzing is ideal for hobbyists, educators, and professionals who want to prototype and document their electronic projects.
Key Features of Fritzing
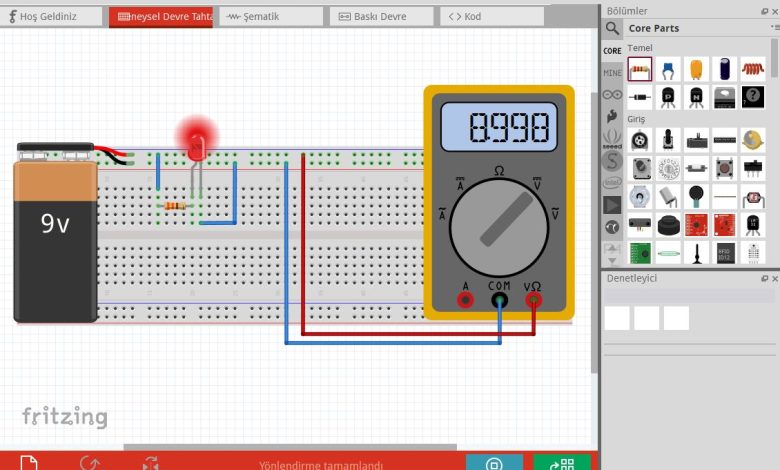
Breadboard View: Users can place components on a virtual breadboard, making it easy to visualize the physical layout of a circuit.
Schematic View: Fritzing provides a traditional schematic view that is essential for understanding the electrical connections in a circuit.
PCB Layout: Once your circuit design is complete, you can switch to the PCB layout view to design a printed circuit board.
Component Library: Fritzing comes with a vast library of electronic components, including resistors, capacitors, microcontrollers, and more.
Community Sharing: Users can share their designs with the Fritzing community, allowing others to learn from and build upon their projects.
Installing Fritzing
Step 1: Download Fritzing
To install Fritzing, you first need to download the software. Here’s how:
Visit the Fritzing website to access the download section.
Choose the version compatible with your operating system (Windows, macOS, or Linux).
Click the download link to begin the download process.
Step 2: Install Fritzing
After downloading the installer, follow the steps below based on your operating system:
For Windows:
Locate the downloaded .exe file in your Downloads folder and double-click it to run the installer.
Follow the on-screen instructions to complete the installation process.
Once installed, you can launch Fritzing from the Start menu.
For macOS:
Open the downloaded .dmg file.
Drag the Fritzing application into your Applications folder.
Open Fritzing from the Applications folder or Launchpad.
For Linux:
Extract the downloaded .tar.gz file to your preferred directory.
Open a terminal and navigate to the extracted folder.
Run the following command to start Fritzing:
./fritzing
Step 3: First Launch
After installing, launch Fritzing. You may be prompted to allow the application to access certain features, such as your file system. Grant the necessary permissions, and you will be greeted with the Fritzing interface.
Using Fritzing
Creating Your First Project
Once Fritzing is installed, you can start creating your electronic designs. Here’s a step-by-step guide to help you through your first project.
Step 1: Start a New Project
Open Fritzing and select “File” > “New” to create a new project.
You will see the main interface with three views: Breadboard, Schematic, and PCB.
Step 2: Add Components
Click on the “Parts” library in the right sidebar to open the component library.
Search for the components you need (e.g., resistors, LEDs, microcontrollers).
Drag and drop the desired components onto the Breadboard view to start building your circuit.
Step 3: Connect Components
Use the wire tool from the toolbar to connect the pins of your components.
Click on a pin and drag the wire to the corresponding pin on another component to create a connection.
Ensure that your connections reflect your intended circuit design.
Step 4: Switch to Schematic View
Once you have completed the Breadboard layout, switch to the Schematic view by clicking on the “Schematic” tab.
Review the connections, making any necessary adjustments to ensure accuracy.
Step 5: Design Your PCB
If you plan to create a PCB, switch to the PCB view by clicking on the “PCB” tab.
Arrange the components and route the traces according to your design specifications.
Use the tools provided to adjust the layout, ensuring optimal design for manufacturing.
Exporting Your Design
Once you’ve completed your project, you can export your design for sharing or manufacturing.
Select “File” > “Export” and choose the format that suits your needs (e.g., PDF, SVG, Gerber for PCB manufacturing).
Follow the prompts to save your design in the desired location.
Community and Resources
Fritzing has a vibrant community where you can find tutorials, share your projects, and get support. Visit the Fritzing forum for discussions, tips, and more resources.


